
Looking for Poster Printing?
Click on the button to fill out the form to submit a poster for printing.
Please allow one business day for processing.
Printers
The Elder, Hering, and Eltoft labs each have a color printer.
These printers all use a common print queue “ptrecs-labs-pcl.iowa.uiowa.edu”
| Lab Name | Location | Printer Name | Printer Queue |
|---|---|---|---|
| Elder | 1231 SC | ptrecs00 | ptrecs-labs-pcl.iowa.uiowa.edu |
| Hering | 1220 SC | ptrecs01 | ptrecs-labs-pcl.iowa.uiowa.edu |
| 2301 SC | 2301 SC | ptrecs02 | ptrecs-labs-pcl.iowa.uiowa.edu |
Students can print from Windows or Linux applications to those printers. You can print formatted text, PDF, and PostScript files on the lab and departmental laser printers. You need to use the printer release station to print documents that have been queued to the printer. The release station is built into the printer.
Black and White Printing cost $0.03 per page, unless you select duplex printing which has a charge of $0.02 per page.
Color Printing costs $0.15 per side printed. If you print duplex (on both sides of the page), the cost for the two pages is $0.20, a savings of $0.10 cents.
WARNING: Be sure you are printer setting on the computer are set to print to Black and White and not Color. If you do not have it set that way it will default to Color and you will be charged the Color rate.
Touchless Print Release
- Print documents to printer queue “ptrecs-labs-pcl.iowa.uiowa.edu”
- Go to the printer you wish to use, it may be any of the lab printers in Elder Lab (1231 SC), Hering Lab (1220 SC) or Eltoft Lab (2301 SC).
- Access the release web page from your phone
- Option 1: Scan the QR Code on the printer
Simply scan the code and open it in a browser on your phone (below or located on the printer)
Location Printer name QR code Elder Lab (1231 SC) ptrecs00 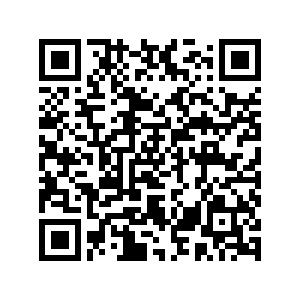
Hering Lab (1220 SC) ptrecs01 
Eltoft Lab (2301 SC) ptrecs02 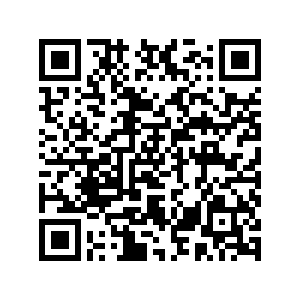
- Log into the interface with your hawkid and password
- Option 2: Manually open
- Open a browser on your phone/tablet
- Go to https://printing.engineering.uiowa.edu:9192/mr
- Log into the interface with your hawkid and password
- Select the printer you wish to print to (name on printer below QR Code)
- Select the jobs you wish, and press the Release button at the bottom of the page.
Print Release From Printer
The printers each have a built in print release station.
Be sure you are printing to the common print queue “ptrecs-labs-pcl.iowa.uiowa.edu”
You can simply place your Iowa One (student ID) card where it says "Scan Here" on the printer (upper left side of the front of the printer). The screen on the left front of the printer will then allow you to select and print your jobs. Or you may log the screen to to login with your HawkID and password and release them.
After login by you Iowa One card or by directly login with your HawkID, you see all file(s) queued for printing. You can select to print or cancel each job of yours. The queue information includes the number of pages that will be printed and the print cost.
Jobs are queued and must be released for printing so that you select what you print. Print jobs stay in the print queue for 12 hours.
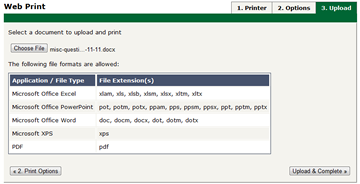
Web Print
Web print lets you upload and print jobs from your laptop to printers in the Seamans Center.
To use Web Print, go to https://printing.engineering.uiowa.edu:9192/user. Enter your engineering account ID (Username) and password. Select Web Print from the left side of the screen. Click on Submit a Job >> in the upper right of the screen.
Web Print opens at the first of 3 steps.
If you use OpenOffice to create documents to print, remember to save your document as .doc rather than .odt.
If you upload a file that cannot be printed, you will see the message at the top of the screen "The uploaded file type is not supported. See the table below for supported files types."
- Click the radio button to select the desired printer from the available list. Then click 2.Print Options and Account Selection >>.
- Enter the number of copies to print. The default is one (1). Then click Upload Document>>.
- Click Choose File to select the file to print. Browse for the file and select Open. Note that the file must be one of the file types listed. After you have selected the file to print, click Upload & Complete >>.
Web Print sends the job to print and displays the submit time, printer, document name, number of pages to print, cost, and status.
Log Out (from the left side of the screen) when you are done.
Print Quotas
Every student Engineering account has a dollar-based print quota for printing. As of fall 2023, students are allocated $5.00 for Engineering students and $1.00 for Non-Engineering students of print quota at the beginning of the fall, spring, and summer semesters. At the beginning of each semester, print quota is reset to the allocated amount.
Once you have used all of your initial quota, you begin using credit printing. The default print credit amount is $30/month and this amount is enabled by default for each valid engineering account. With credit printing as you print pages each month, the charges are accumulated. Until the monthly printing has been added to your U-Bill, your printing quota will show a negative balance. Each month your U-Bill will show a charge for the printing you have done, up to the amount you authorized. After the month's print charge has been added to your U-Bill, your print account is set back to zero and you begin credit printing up to the monthly limit.
Every month ECS charges negative print balances > $1.00 to your U-Bill.
If you do not want printing charged to your U-Bill or you want to authorize a monthly amount less than $30, you must come into the ECS main office, 1256 SC.
Checking Your Print Quota
When you login, you will see a small window in the upper right corner of your screen with your current balance, as illustrated here.
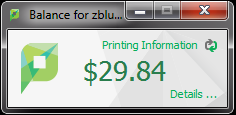
Click on the Details… link in the box and then log in to look at your print and transaction history. You can also see the environmental impact of your print jobs. You can minimize the Papercut window if you do not want it open on your desktop all the time.
If you don't see the papercut box above, then click here for your engineering printing balance.
Printing from Linux
To print from Linux applications, select the Print option from the application menu and follow the instructions and choose the printer you would like to use. If you are working in the Elder lab, choose printer ptrecs00. If you are working in Hering lab, choose printer ptrecs01. If you are working in the TA space in 2301 lab, choose printer ptrecs02.
From the search bar, type print and choose printing to view all the lab printers. Right click on the printer and select print queue to view your files in the print queue.
From a shell, use
lpstat -u username(username is your engineering account ID) command to view your files in the print queue.
lpstat -tcommand to view the status of all of your printers.
Printing from Windows Applications
To print a file, select the Print option from the application menu and follow the instructions. Your print quota is adjusted by the number of pages that you print.
Printing is automatically set to print on one side of the paper. You can use duplex printing (prints on the front and back of the page); see the Printing Preferences section below for how to select duplex printing.
Adding a Printer [Windows]
Go to Start | Settings | Devices | Printer & Scanners. Select Add a printer or scanner from the top and scroll down to past all the listed printers, towards the bottom of the page. Click on The printer that I want isn't listed. Proceed as described below.
Choose Select a shared printer by name and enter \\engr-ps000\ in the box. A list will appear, but you can continue typing the name of the printer and type of printing. For example, \\engr-ps000\ptrecs-labs-pcl will add the lab printing queue with a PCL (Print Control Language) type of printing.
Click next and the driver will be installed and the next screen will have the option to keep the printer as your default printer. Click Finished, saving your choice.
Printing Preferences
At any time, you can change your printing preferences to enable, change, or disable any features such as watermarks, single sided printing, the weight of paper used in a manual tray, or envelopes.

Changing these settings in the control panel will change the default behavior of your print jobs from all applications to the specific printer being modified.
Note about duplex printing: the printer paper handler briefly extrudes the paper to turn it over and print on the other side. Please wait until the pages are in the top output tray before removing them.
Print Job: Status
In the printer window (Start | Devices and Printers) double click on the printer to which you sent the job to see the status of your print job. If the print queue is short, your job may disappear from the printer status window before you can view your print job. The print queue window includes information on the document name, status, number of pages, size, and time submitted to print.
Troubleshooting Printing Problems
Printer Is Jammed, Out of Paper, or Out of Service
If one of the lab printers is out of service, please notify a consultant or ECS staff member in 1253 or 1256 SC. If no one available, please leave the printer alone. The problem will be corrected as soon as a staff member is available.
File Won't Print
If you have sent a file to the printer that has not printed within a reasonable amount of time and you have enough print quota, please do not re-send the file. Check to see if there was an error message on your screen.
If you cannot get your file to print and there is no problem with the printer, see the consultant at the Engineering Help Desk in 1253 SC for assistance, or call the consultant at 319-335-5055.
Cancel Print Job
What happens to my print balance when I cancel a print job?
One of two things:
- Scenario 1: Your print job is second, third, fourth, or any position other than first in the print queue. Papercut should refund the print job after you cancel it. You should see the refund reflected in your balance window shortly after you cancel the print job. You can also click on the Details link in the balance window, login to your personal print accounting page and check your recent print history to see whether papercut cancelled and refunded your print job.
- Scenario 2: Your job is first in the print queue. If you go the the printer on which your job is printing and cancel the job, Papercut will not charge you for the unprinted pages. You will be charged for pages already printed.
Set Default Printer (optional)
While this is not always needed, occasionally you might need to set a default printer. Here are the steps:
| Step | Screenshot |
|---|---|
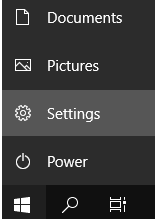
| 1) Go to Start | Settings |
|
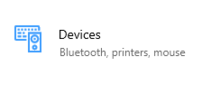
| 2) Select Devices |
|
| 3) Select Printers & scanners |
|
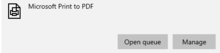
| 4) Select your desired printer, then click on Manage |
|
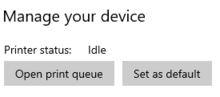
| 5) Click on Set as default |
|
If you need further help
Talk to the consultant at the Engineering Help Desk, 319-335-5055, 1253 SC, for help with printing. Report your problem to request assistance.